Do you remember your 6th Grade science classes?
Did you ever think “This is going to be no use to me in the real world”?
Welcome to home brewing – the thing that’s going to prove you wrong.
Using a hydrometer, and a little 6th Grade math, you can find out the percentage of alcohol by volume of anything you brew at home, from simple beer to complex spirits.

BEER DROP: Boxes of beer from Award-winning microbreweries → Join The Club
Before we get carried away with the hows of this process, let’s make sure we’re all on the same page with the whats of it.
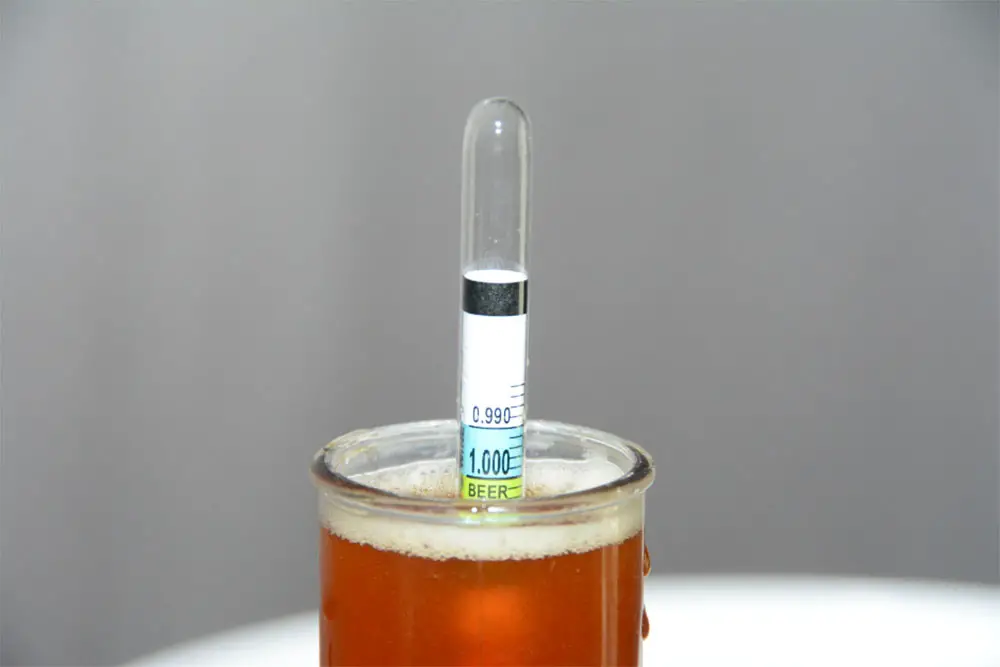
What’s A Hydrometer, And How Does It Work?
A hydrometer is usually a long glass tube with a bulb at one end. It looks pretty much like a thermometer, but instead of temperature, it measures what’s called the specific gravity on liquids.
Why would you want to know the specific gravity of liquids when you’re brewing?
Because it can be an imprecise process, and you want it to be more precise, so you can make informed decisions about your brewing rather than flying entirely on instinct.
If you can tell what the sugar content of your wort is, and what temperature it is, you can work out what its potential alcohol by volume is.
If you can do that, you can work out what its alcohol by volume content will be once it’s gone through the fermentation process.
So How Does A Hydrometer Work?
First, you’re going to need some wort.
- Scoop enough of your pre-yeast bittersweet sugar solution into a container.
- Put your hydrometer into the wort.
- Give it a spin – that’s to clear it of any air bubbles clinging to it. It should settle to a level.
- Read the figures for specific gravity showing at the point where the hydrometer breaks the surface of the liquid.
- There’s an art to this – read the figures at the bottom of the meniscus (that little bubble of liquid that rises up the side of the glass tube. If you take the reading at the top of the meniscus, it won’t be as accurate.
- Check the instructions on your hydrometer – it may be calibrated to something like 15 or 20 degrees Celsius.
- Check the temperature of your wort with a thermometer.
- If it’s at a different temperature to what your hydrometer is set at, you’re going to have to do some calculation. There are any number of calculator options online that will help you with this.
- That calculation should give you the specific gravity of your wort at the temperature at which it’s currently resting for testing. Note the results for later.
Now, you face a choice. Do you replace the wort you’ve tested in the rest of the batch or not?
Remember, if you do return it, you’re giving bacteria from outside the process the chance to get in, which could theoretically ruin the batch.
The more efficiently sanitized everything is – the container, the hydrometer, and anything you use to take your sample – the less likely you are to cross-contaminate your batch, but wise old brewing tradition advises that you test only twice, once before fermentation and once after, and that you don’t return tested wort to the mix.
When you’re done with our fermentation process, take a second sample and re-test it for specific gravity.
Once you have your two specific gravity recordings, you’re one simple-ish calculation away from having your ABV rating for the batch.
If you take your second reading from your first, and then multiply that by the mystical number 131, you’ll get your percentage ABV figure. That’s:
(Original gravity – Final gravity) x 131 – % ABV.
Because life is sometimes too short to do recreational math, there are specific ABV calculators online to help you with this. Though really speaking, even the calculator app on your phone should be able to handle it, as it’s just a sum using three numbers, all of which you know.
There’s nothing especially complicated about using a hydrometer to find the specific gravity of a portion of your wort. And if you can do that twice and remember the magic number 131, you have yourself a ready reckoning tool to help gauge the alcohol by volume of any batch of beer or spirits you care to brew.
It’s worth knowing though that many old brewers tell their young apprentices not to bother with hydrometers at all when they start out, because it adds steps to the brewing process and can add both extra stress and confusion, and extra opportunities to introduce outside bacteria into the batch.
That said, so long as you’re scrupulous about keeping your equipment sterile, the dangers of introducing outside bacteria should be relatively small, and the hydrometer testing takes a lot of the guesswork out of the brewing – and especially the fermentation – process.
If you find yourself drawing out significant quantities of wort per testing, don’t have the confidence to add it back to the batch once it’s been testing, and are starting to resent the amount of product lost to the testing process, there is an alternative to the hydrometer.
Known as a refractometer, it’s an easier, low-waste method of calculating the ABV of a batch.
A refractometer measures specific gravity not by immersion in a quantity of liquid, but by the degree to which a drop of liquid refracts light when it hits the drop.
Yes, that’s right – one drop.
Rather than losing a good glug of beer each time you test, as with a standard hydrometer, the use of refraction means you can take only a miniscule amount of your wort, drip it onto the refractometer, and boom! You have yourself an instant specific gravity reading.
There are other reasons why refractometers are becoming more popular with traditional hydrometer-using brewers. For instance, with a refractometer, you can not only take pre-boil gravity readings and post-boil gravity readings.
Because the amount of product lost each time is so small, you can even take gravity readings during your boil. Why would you want to do that?
It depends – if you’re doing significantly complex brewing, or if you’re developing particular recipes, it will be useful to know how your specific gravity, and therefore your eventual ABV – is going to look at several stages during the boil, so you can chart the breakdown of sugars into alcohol with much greater precision.
Also, you can correct for temperature up to 85˚F with a refractometer, which is a godsend if you don’t have time to wait for developing alcohol to reach the standard room temperature before you do anything with it.
Naturally, there are also some drawbacks to using a refractometer over a standard hydrometer.
Firstly, the calculation is significantly more complicated to get your ABV score. Most refractometers measure their samples in Brix – the measurement of sugar content in a solution. 1 degree of Brix is akin to 1 gram of sucrose in 100 grams of solution.
In theory, that’s great and highly specific. In practice it means your standard calculator – not to mention your standard brain – is going to break down and weep a little in the corner if you try to use them to turn your refractometer reading into a meaningful figure for ABV.
You’re taking the figure in Brix and turning it into a figure for specific gravity.
Yes, absolutely – by far the easiest way is to get an online calculator or a phone app that can handle these kinds of calculations.
It’s also worth keeping in mind that once you start your fermentation process, you’re producing alcohol. And that alcohol is going to skew the raw refractometer readings.
In other words, once fermentation starts, the presence of alcohol will mean you need to correct for alcoholic values, rather than simply reading off and trusting to the values your refractometer is showing you.
That’s going to involve you in using one calculator for specific gravity, and then a whole other calculator once your wort starts its fermentation journey, to offset the effect of the presence of developing alcohol.
It’s certainly a process you can do, and there are – you won’t be surprised to learn – specific calculators available online that can help you get the right offset figures simply by plugging in the numbers you do know, so as to make your use of a refractor as straightforward as it can be.
Whether you use an old-style standard hydrometer, or a new-fangled and much more efficient refractometer, the principle is the same: you need to measure your wort’s specific gravity at least twice – and more if you’re doing complex brewing or recipe development – so as to give yourself a clear idea of your sugar percentage, and how much of that is going to be turned into alcohol during the fermentation process.
Without a hydrometer, you’re doing things the old-fashioned way which involves getting much more rough results – and only being able to give your friends, neighbors, or even customers, a much more vague idea of exactly what it is they’re drinking.
That can be hazardous in both directions, with strong drinkers demanding something more, or infrequent drinkers passing out on the floor if your beer turns out to be stronger than you gave it credit for.
The hydrometer – or the refractometer in more modern brewing operations – helps to mitigate such shocks and surprises, and give you the beer you were aiming to brew.